I have a lot of friends who mill their own wheat and make bread. A couple of years ago, I just didn't get it. "They sell bread at the grocery store, you know," I would say to them. They would tell me about the many health benefits of milling your own wheat, but I ignored the growing desire to follow them into the world of Make-Your-Own-Bread. Quite honestly, I was more intimidated than skeptical. (I would go into the health benefits of using the freshly milled WHOLE grain vs. what flour manufacturers do, but it is so lengthy. Google it.)
Finally, I decided to make my own bread. But I would do it my way. I still didn't fully understand what processes a bag of store flour goes through, so I decided I would just use the whole wheat flour from the store. And I bought a breadmaker.
I was so excited. I was going to do this. But I had found a short cut. The breadmaker did make things easy. About 10 minutes to throw the ingredients in, and then it did the rest. And the house filled with a wonderful bread-baking smell. And when it came out, though it was an odd square shape, it did look good. "Fresh bread!" I called to the kids. They came running...and devoured the whole loaf in 10 seconds flat.
Yeah. 1 loaf of bread for a family of 6. Not brilliant. I must note, though, that I hang on to my breadmaker for one single use on one single special night of the year: on Christmas Eve the bread machine makes perfect dough for my Clone of a Cinnabon recipe which makes a DELICIOUS addition to Christmas morning breakfast. I'm not so sure I can healthify those yummy rolls; however, I do have 85 days to figure it out. I'll consider that my challenge.
Anyway, we were visiting some dear friends in MO, and Kim is a wheat grinder, bread maker (don't you love the titles I so lovingly bestow upon people?). While we were there, she made bread for us, and I was able to not only taste how delicious WHOLE bread is, but also observe how very easy it is!
So then I had to decide - with my husband's help and wisdom - if we wanted to do this or not. It is about a $600 initial investment, but when you look at it as an investment in your health...well, I had my husband sold on that part. What he was skeptical about was if I would purchase all this stuff and then add it to my Shelf of Unused Appliances after a week or two. (It's not like he didn't have a good argument. Exhibit A: The Bread Machine (though I had to argue that the Christmas Cinnabon Rolls totally make that worth it)). But in the end, we decided to take the plunge, and I'm happy to say that my mill and mixer get much more than just a once-a-year workout.
Anyway, this is the equipment I use:
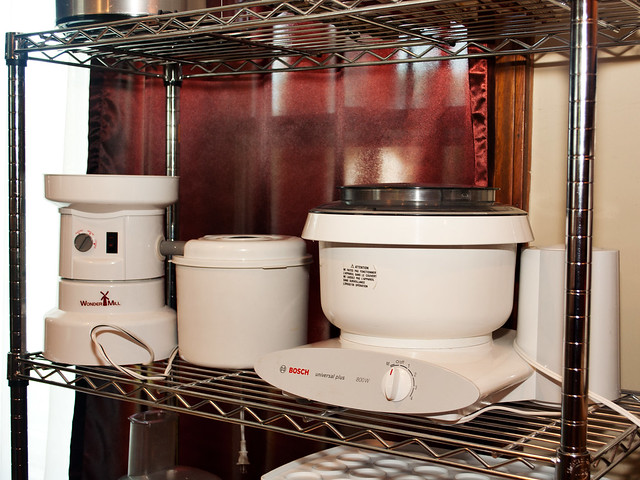
On the left is my Wondermill, and on the right is my Bosch mixer, which can mix enough dough to make like 10 loaves of bread. I only make 6 at a time, so I don't exactly remember its capacity, but it's adequate for our family. I got all of my start-up equipment and bulk ingredients like yeast and dough enhancer from Urban Homemaker.
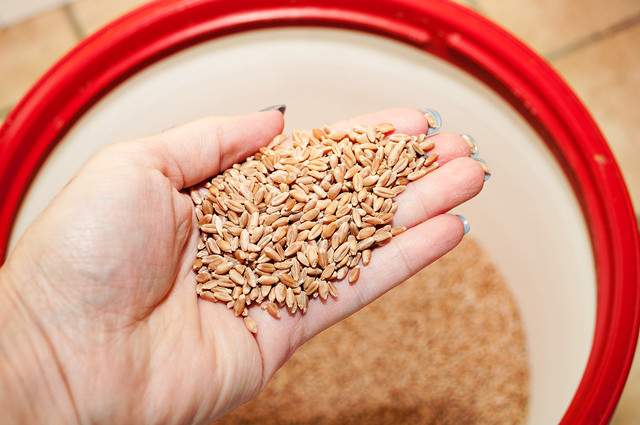
Then of course you need the wheat. Hard red will give you that very unique "whole wheat" taste. As I mentioned in an earlier post, I only use hard red for bread. I use hard white for everything else. (Again, if you are not ready to take the plunge into the fun world of wheat and milling, use King Arthur's whole wheat flour.) You can also get soft white which is recommended for cookies and cakes. I had some for awhile, but I really didn't notice a difference between the two, and I found the soft wheat harder to work with because it didn't always measure 1:1. Perhaps if I was doing pastries, I would opt for the soft wheat. I keep my bulk hard red and hard white in big buckets like this that will store grain forever!

I used to always get my grain at Bread Beckers. That's because they are located in GA. Even to ship a 50lb. bucket of wheat to my home an hour away in GA was only $14. To CT? Shipping is about $47! It looked like my wheat milling, bread making days were over because I could find NOTHING like Bread Beckers up here. THEN I found Honeyville Grain. They ship for a flat $4.49. Yes, that's four dollars and forty-nine cents! So I recently got a 50lb. bag of hard white wheat shipped to me from California for $4.49!
So anyway, let's get on with making the bread. This is such an easy recipe. I
Mill enough wheat berries to get 10-12 c. flour
Warm together:
6 c. water (or 5 c. water + 1 c. plain yogurt)
2 c. of the flour
3 T. yeast
Sponge mixture for 15 minutes.
Meanwhile, heat together 2/3 c. honey and 2/3 c. oil
Mix together:
remaining flour
1 1/2 T. salt
3 T. dough enhancer (lecithin)
1/4-1/2 c. wheat gluten (optional)
Add honey mixture to yeast mixture and stir; while mixing, gradually add flour mixture.
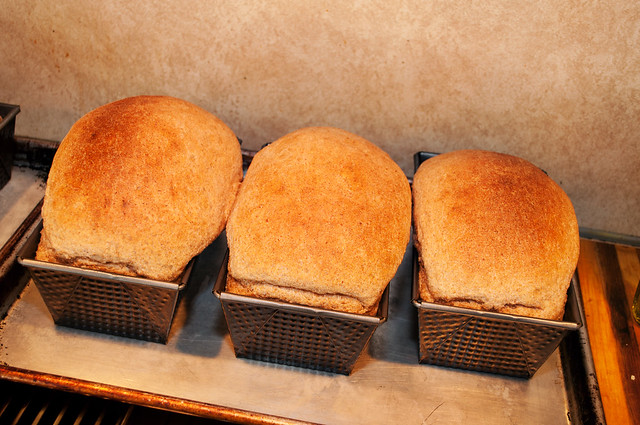
Knead in mixer for 8 minutes. Turn out on to oiled surface and dividein to 6 loaves. Place in oiled pans and let rise 30 minutes. Bake at 350 for 30 minutes.
So I start by milling my wheat. I don't know how it works, but you get more flour than you use wheat (ex: 1 cup of wheat berries generally yields about 1 1/4 c. flour). I know there's an explanation for this, but it probably involves math, so I'll leave it alone.
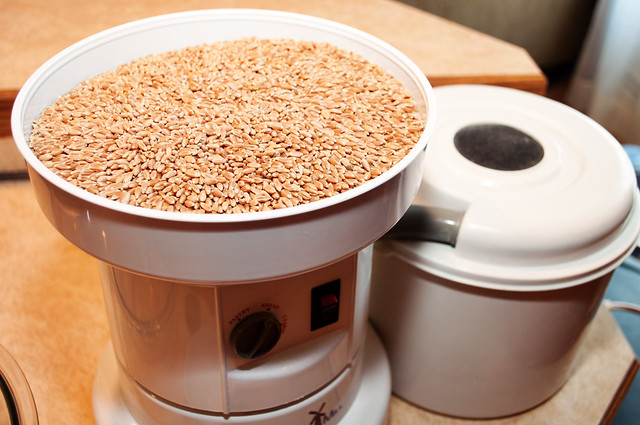
Anyway, in GA I had to only use 8 cups of wheat berries to get the right dough consistency. Up here for some reason, I have to use 9 (everything costs more here, so that must be why). So I mill 9 cups of wheat berries.
Then I put 5 cups of the hottest tap water possible into my bowl. I then add 1 cup of yogurt. The cold of the yogurt makes the hot water cool to lukewarm which is perfect for yeast. Add the flour and yeast and pour into your mixer.
Then you have 15 minutes to do whatever you want to. My 15 minutes included administering a grammar test to 2 wiggly boys. And cleaning up my mess so far (I am obnoxiously meticulous about cleaning as I go - ask my husband. I make him so mad because he'll call us for dinner, and I'll immediately clean up the mess before sitting down for dinner; I just can't enjoy a meal with a messy kitchen). And preparing for the next step: I put the lecithin and salt in the remaining flour. I also grind up some flax seed which I also add to the flour. Finally, I combine and then heat up the honey and oil for about 45 minutes in the microwave. This blends it better and adds a little more heat for that yeast.
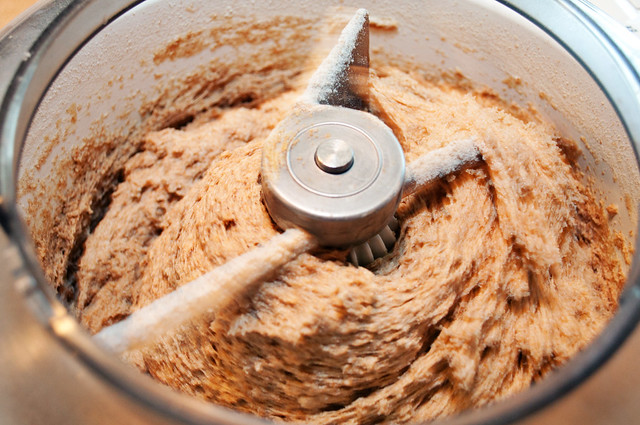
When my 15 is up, I start the mixer, swirl the oil/honey in, and then start adding flour. This is very important. The mistake many people make with bread is making the dough too stiff. You don't want a consistency like pizza dough. You want a soft dough. The way you know it is right is when the dough just begins to pull off the side of the mixer NOT when it is cleanly swept off the sides like with pizza dough.
So get the right amount of flour and then run the mixer for another 8 minutes to knead the dough. Then - and here's a great trick I learned from my MO friend - you know how usually when you throw some dough on the counter you sprinkle some flour down first so the dough won't stick? Well, that flour always ends up drying out your dough. So instead, spread some oil over your countertop. Get lots on your fingers and hands too so YOU won't stick to the dough!

OK, so at this point occasionally I will use a scale to get uniform loaves but usually I do not have the time to give in to such compulsions, so I just eyeball it. I cut it into 6 "equal" pieces and form loaves with 5 of them. With the 6th one, I spread it out, sprinkle a Sucanat/cinnamon mixture on it, roll it up, form it into a loaf, and plop it into a pan.
Oh, and my pans - I got them from Urban Homemaker too. They are on the smaller side (8" maybe vs. 10"??), so I get 6 loaves. If you use larger pans, you might only get 5 loaves.
Then the loaves rise for 30 minutes (time to do school with the littles one, clean up, start this post).

Then in the oven at 350 for 30 minutes. And done!
Once they're all cooled off, into my professional bread bags - you can buy them by the 100 from Bread Beckers or Urban Homemaker (or you could just save some from the store bought bread you used to buy).
That's it! It really is an easy process, especially once you've done it a couple times. I mean, I taught my kids some school and cleaned my kitchen and baked bread all in an hour and half!
Jumped in the car a few weeks ago & Boortz was on, ethan must not have been with me b/c I continued to listen to him. he was talking about the past few years of his life, health conditions such as depression, heart & cholesterol, weight issues, etc. then he mention a book his heart doc told him to read. he did & decided to follow the advice of his doc & the info in the book, then he started talking about how everything health wise has changed for the better.
ReplyDeleteI decided to blow $10 on the kindle version & the author described my kid's behavior in the 2nd or 3rd chapter....spooky. I"m not a gluten free nut but i'm working towards it. feed john gluten free pasta tonite w/out telling him & he later told me it was pretty good. hehe
check it out -
http://www.wheatbellyblog.com/about-the-author/
sharon